Seamless Setup: Unleashing YugabyteDB on Ubuntu 20.04 for Single Zone Deployment Mastery

Step-by-Step Guide to Installing and Configuring YugabyteDB on Ubuntu 20.04
In a data-driven world, the demand for robust and scalable databases is greater than ever before. Introducing YugabyteDB – an open-source, high-performance distributed SQL database meticulously designed to address the complex requirements of modern applications. If you've recently explored the core concepts of YugabyteDB through our enlightening webinar, it's time to take the next step by installing and configuring this cutting-edge database system on your Linux environment.
This blog post is your comprehensive guide to setting up the YugabyteDB cluster on Ubuntu 20.04 (equally applicable to CentOS). We'll navigate through the intricate process of installation and configuration, preparing you for a successful Single Zone Deployment. For a deeper dive into the architectural nuances and key components of YugabyteDB, don't forget to revisit our recent webinar.
Prerequisites
Before we delve into the installation process, let's make sure we have all the essentials in place, from the compatible operating systems to the necessary port configurations and system requirements.
Inventory Details
To set up a three-node YugabyteDB cluster within a single data center, the following server details are required:
Installation
1. Downloading the YugabyteDB Packages using wget
To begin the installation process, download the YugabyteDB packages using the wget command:
2. Extract the Downloaded Package
After the download is complete, extract the downloaded package using the following command:
3. Change Directory to the Extracted Folder
Navigate to the extracted directory using the command:
4. Execute the Configuration Script
Run the configuration script using the command:
5. Repeat Configuration on Other Nodes
Repeat the same configuration steps on node 2 and node 3 as well.
Starting YB-Master Servers
After completing the installation on all three nodes, the next step is to initiate the YB-Master server process on each of them. The YB-Master service plays a crucial role in maintaining essential system metadata and records. These records include information about tables, tablet locations, user profiles, roles, and their corresponding permissions, among other vital details.
To initiate the YB-Master server process on Node 1, execute the following command:
This command will initiate the YB-Master server process with the specified data directories, namely disk1 and disk2. The master_addresses option requires the IP addresses of all servers in the cluster. For rpc_bind_addresses, we need to provide the ip of the local server where the command is being executed. In this instance, I've used the IP of Node 1, as this command is executed on that node. Ensure that the data directories are created before executing this command.
After the YB-Master server process is launched, you can verify its status by examining the log file located inside the data directory:
Upon accessing this log, you might observe lines such as:
Likewise, perform the identical steps on nodes 2 and 3. It's important to ensure that you only modify the rpc_bind_addresses.
Additionally, you have the option to examine the cluster's status via the admin portal, accessible through port 7000. You can access this portal from any node within the cluster
Please remember to replace the IPs with the corresponding IP addresses of your cluster nodes.
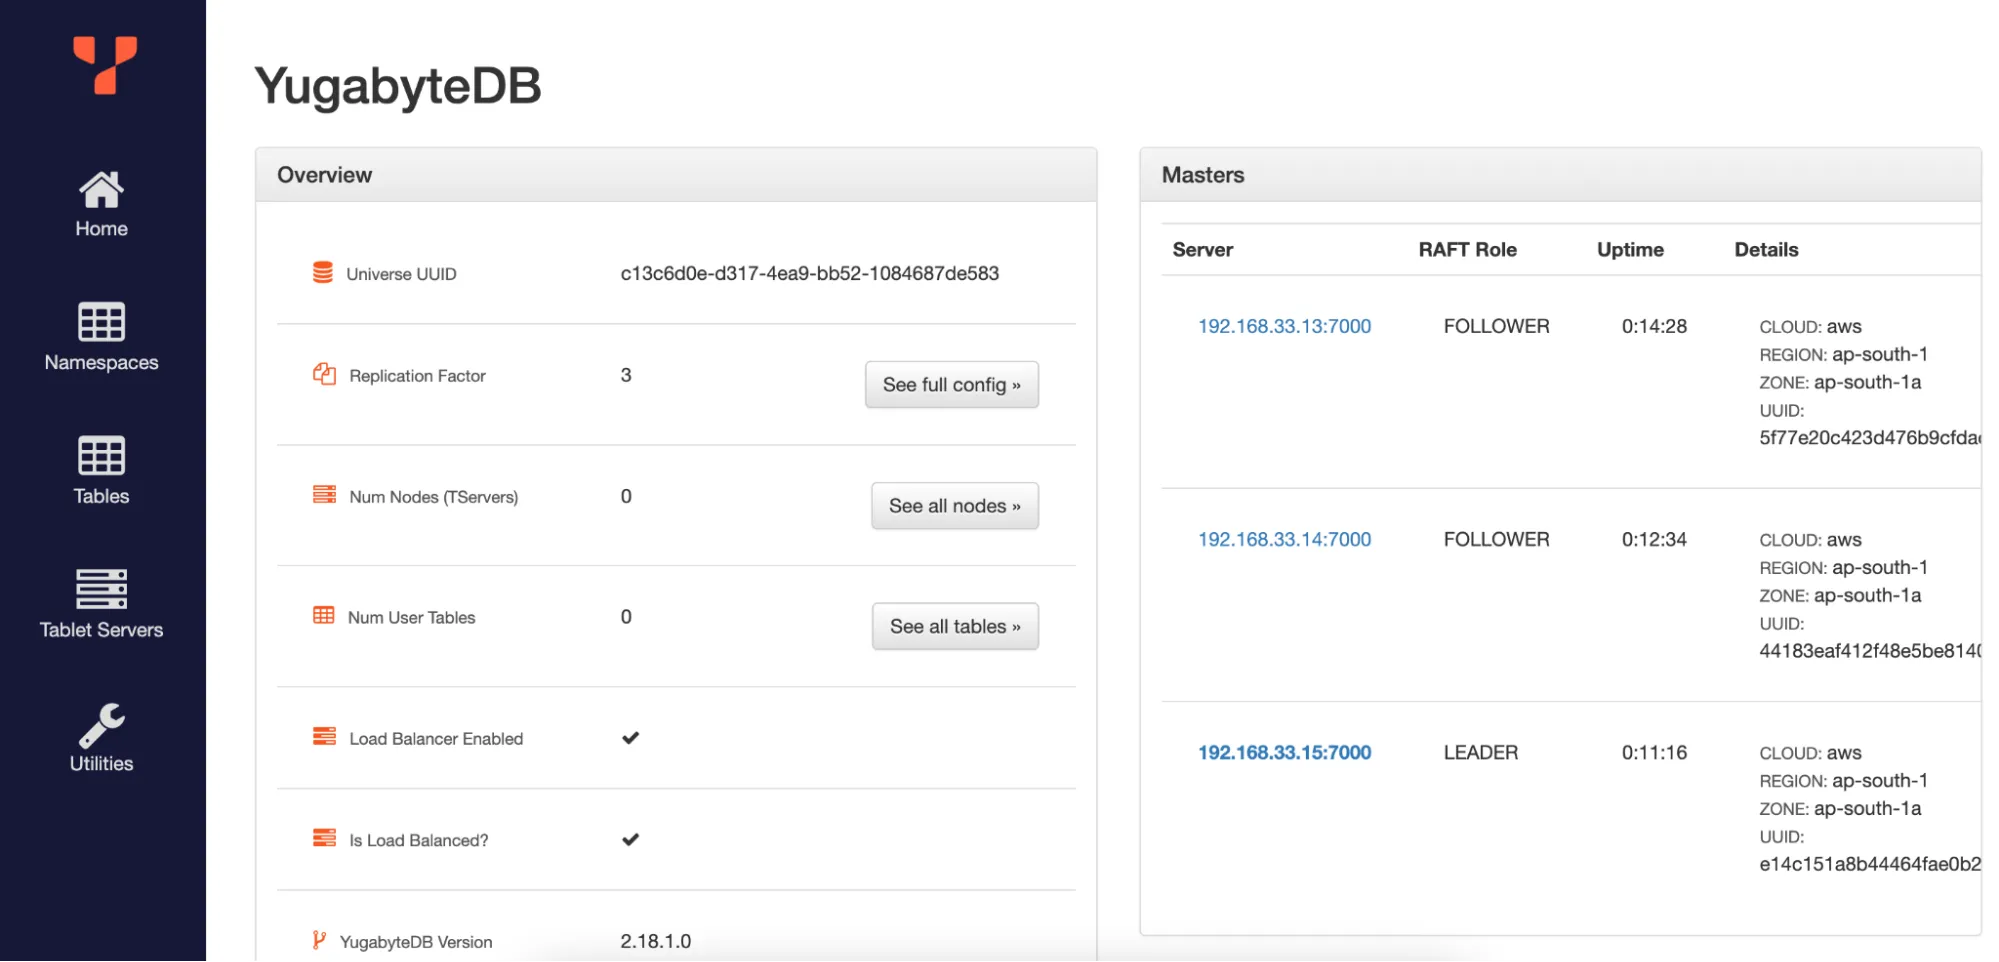
Cluster health also can be checked here.
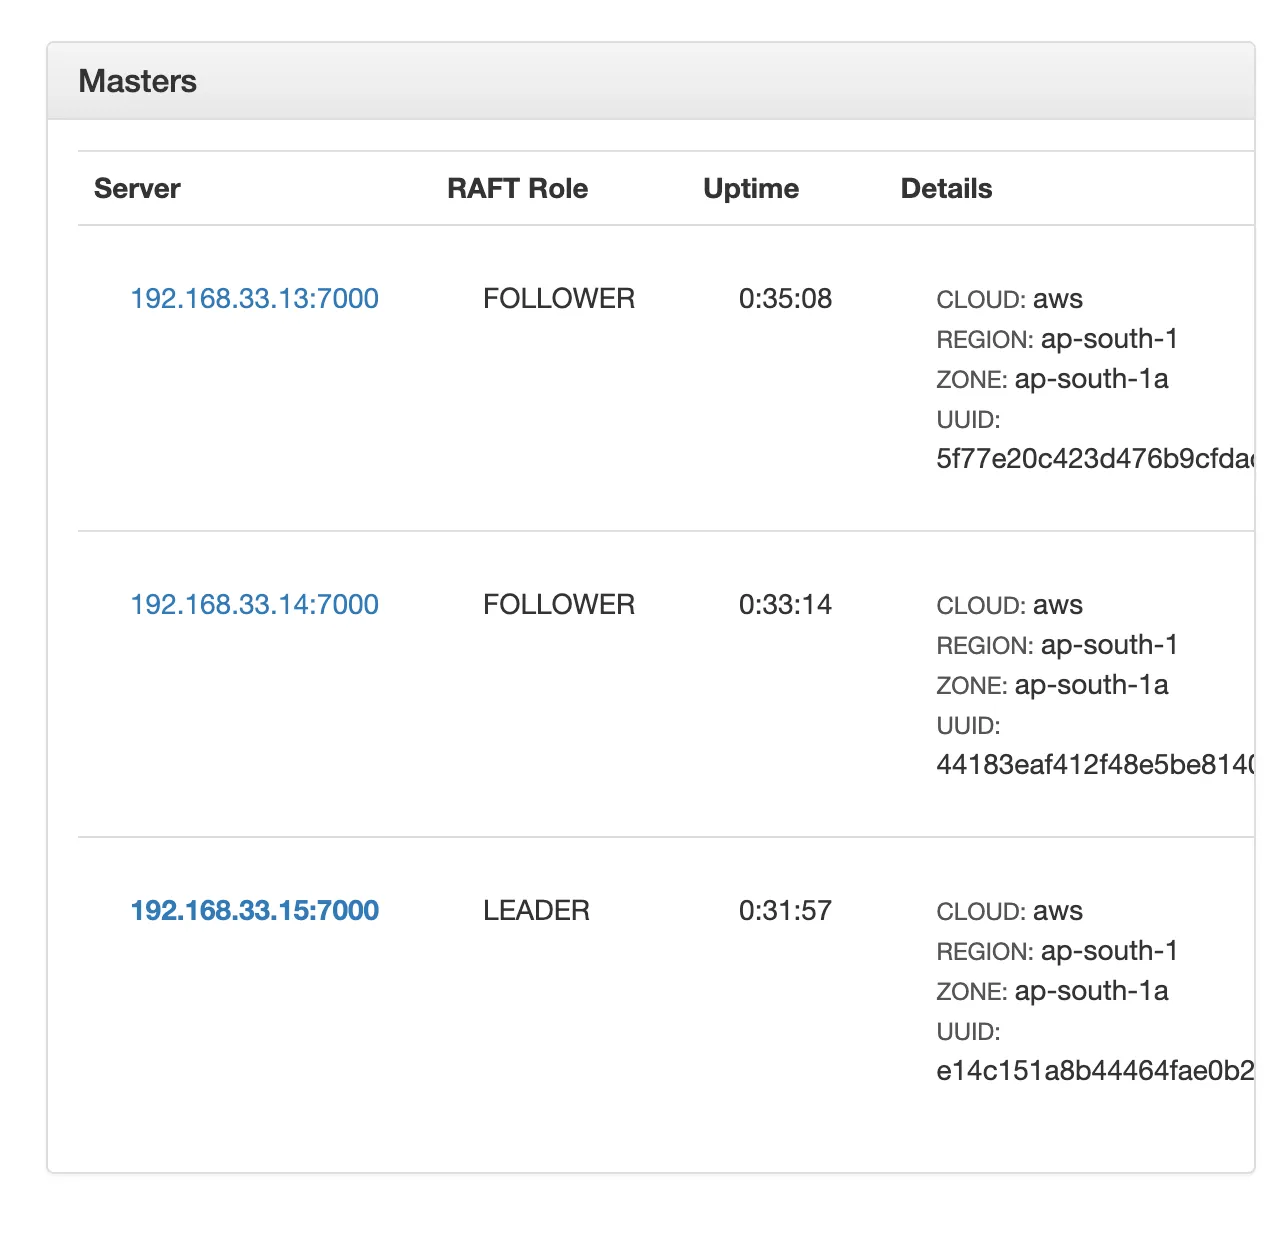
Once the YB-Master servers are up and running, it's time to proceed to the YB-T servers.
Starting the YB-T Servers
The YB-TServer service plays a crucial role in handling the input-output (I/O) of end-user requests within a YugabyteDB cluster.
To initiate the YB-T servers on Node 1, execute the following command:
The binding address options, such as rpc_bind_addresses, pgsql_proxy_bind_address, and cql_proxy_bind_address must be specified with the IP address of the server where the command is being executed. In the preceding command, the IP address of Node 1 was used since the command was executed on Node 1. Be sure to modify these addresses accordingly when executing the command on Node 2 and Node 3.
Be sure to follow the same process on both Node 2 and Node 3 as well.
After successfully starting the YB-T servers on all nodes, you can confirm their status by accessing the Cluster's admin portal, which runs on port 7000, and navigate to the Tablet Servers section.
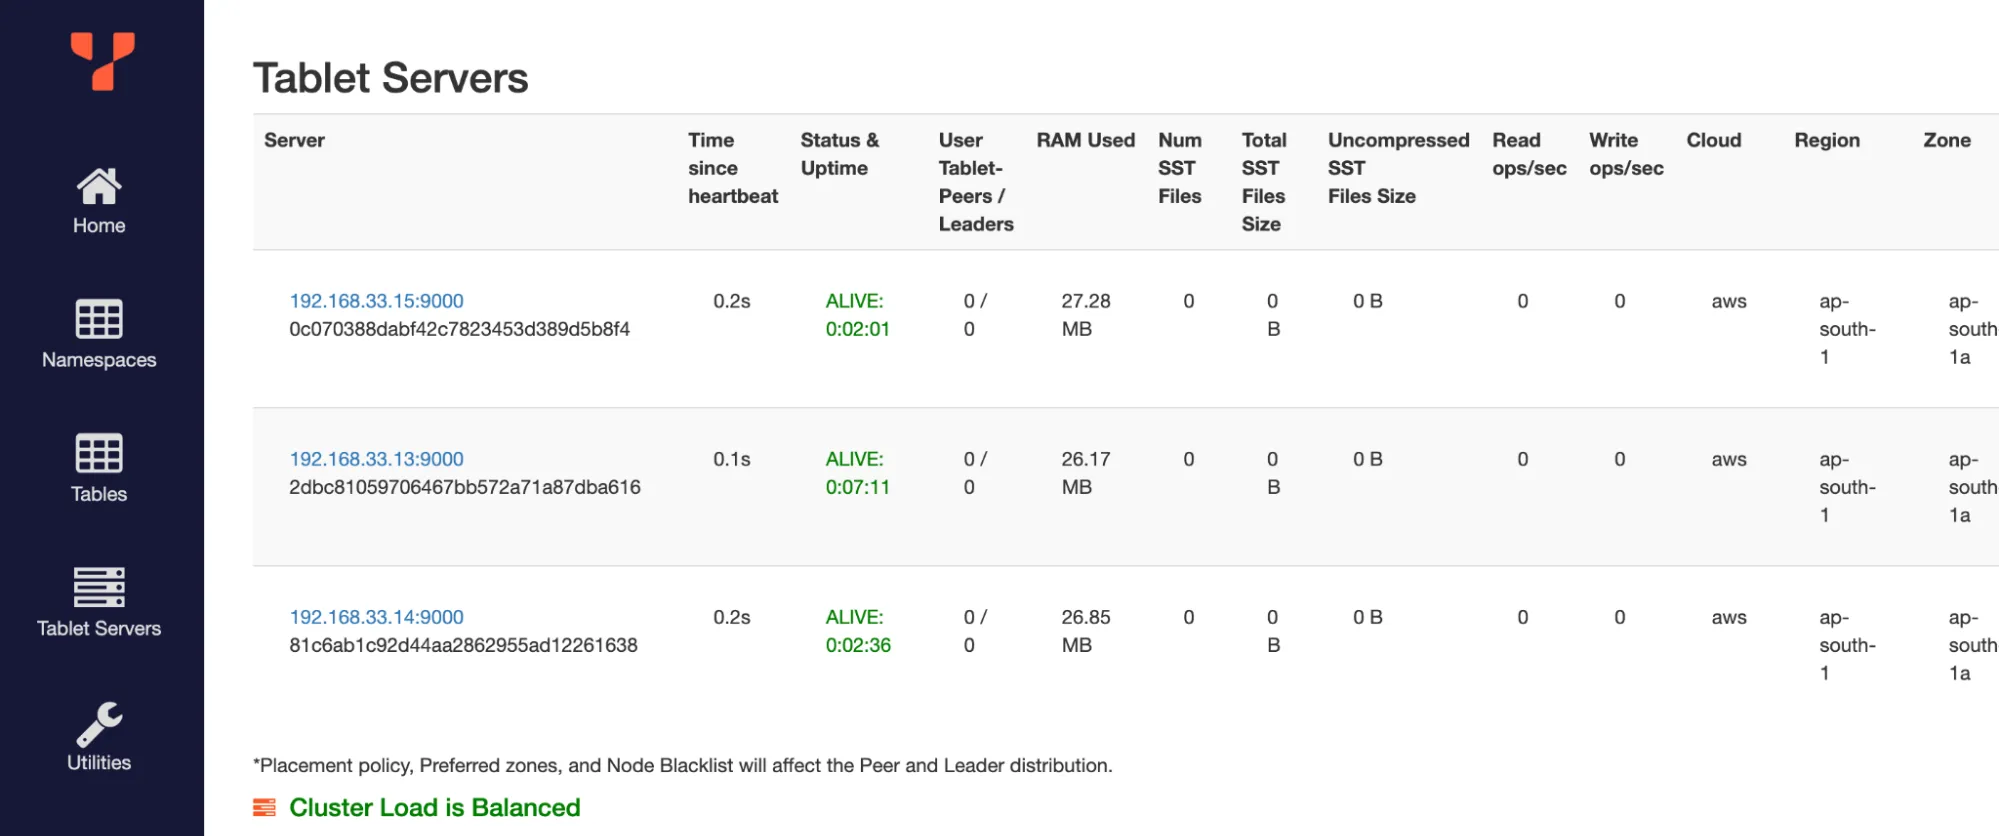
With the 3-node YugabyteDB cluster successfully initiated in a single data center, you can establish connections to the cluster using ports such as 5433 for YSQL and 9042 for YCQL.
YSQL
To connect to YSQL, run the following command:
YCQL
To connect to YCQL, use the following commands:
With your cluster up and running, you're now equipped to explore the world of distributed databases like never before.
We hope this blog has provided you with a comprehensive understanding of the installation and configuration process. Stay tuned for our next blog post, where we'll delve into the exciting topic of scaling out the cluster.


.avif)
.avif)
.avif)

.avif)





.svg)
